
Unleash your inner Spielberg with these must-have gadgets and apps for iPhone filmmakers. Lights, camera, action – let’s film!

Table of Contents
Introduction to iPhone Filmmaking
iPhone filmmaking has become increasingly popular as technology advances, allowing anyone with a smartphone to unleash their creativity and tell their own unique stories through the power of film. With the convenience of having a high-quality camera right in your pocket, mobile filmmaking has opened up a world of possibilities for aspiring filmmakers of all ages.
Whether you’re a beginner looking to dip your toes into the world of filmmaking or a seasoned pro looking for a more accessible way to capture moments on the go, the iPhone provides a versatile tool that can help bring your creative vision to life. In this section, we will explore the exciting realm of iPhone filmmaking and how you can start creating your very own cinematic masterpieces with just a few taps on your smartphone.
Why Choose iPhone for Filmmaking?
This part will discuss the reasons why iPhones are a good choice for making films, including their high-quality cameras and convenience.
High-Quality Camera
One of the main reasons why iPhones are fantastic for filmmaking is because they come equipped with high-quality cameras. These cameras are advanced and can capture crisp, clear images that are perfect for creating movies. With an iPhone, you don’t need to invest in an expensive camera to get professional-looking footage.
Easy to Use
Another great thing about using an iPhone for filmmaking is how easy it is to get started. iPhones are user-friendly devices, so even if you’re new to filmmaking, you can quickly learn how to use your phone to shoot videos. All you need to do is point and shoot, and you’re on your way to creating your own films!
Essential Gear for iPhone Filmmaking
When it comes to creating professional-looking films with your iPhone, having the right lenses and cases can make a world of difference. Special lenses can enhance the capabilities of your iPhone camera, allowing you to capture a wider range of shots and add creative effects. Additionally, sturdy cases not only protect your phone but also provide attachment points for other filmmaking accessories like microphones and lights.
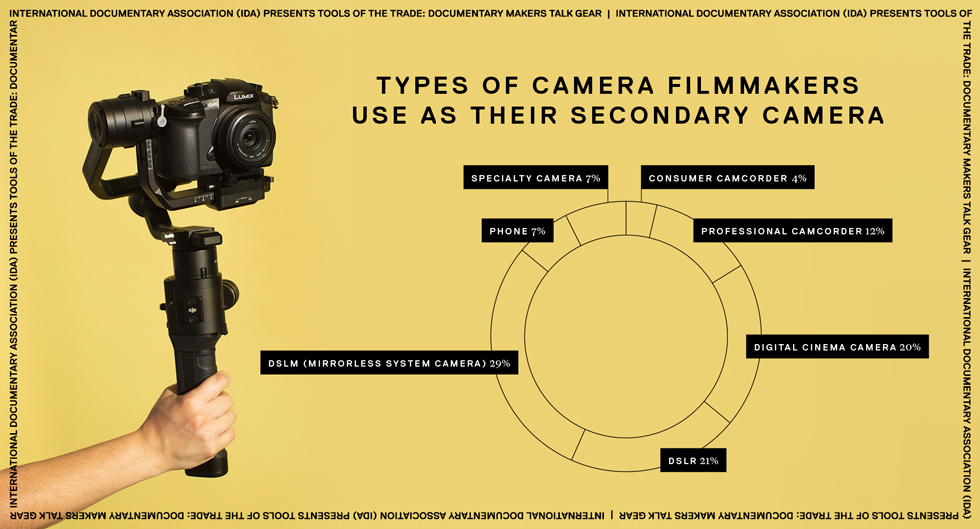
Image courtesy of www.documentary.org via Google Images
Audio Equipment
Good audio is just as important as great visuals when it comes to filmmaking. Using external microphones with your iPhone can significantly improve the quality of sound in your films. There are various options available, from shotgun mics for capturing dialogue to lavalier mics for interviews. Pairing the right microphone with your iPhone can make a world of difference in the overall production value of your films.
Building Your iPhone Filmmaking Rig
In this section, we will guide you on how to assemble the essential gear needed to create a filmmaking rig specifically designed for your iPhone.
Choosing the Right Gear
When building your iPhone filmmaking rig, it’s crucial to select the right gear that suits your filming style and requirements. Start by choosing a sturdy smartphone mount that can securely hold your iPhone in place. Look for mounts with adjustable features to help you achieve the perfect filming angle.
Next, consider investing in a high-quality tripod to provide stability and prevent shaky footage. Tripods come in various sizes and materials, so choose one that best fits your needs. Additionally, opt for a versatile handheld stabilizer or gimbal to capture smooth, professional-looking shots while on the move.
Enhance your filmmaking capabilities by adding external lenses to your iPhone. Wide-angle lenses can expand your field of view, while macro lenses allow for detailed close-up shots. Experiment with different lenses to achieve unique visual effects in your films.
Assembling Your Rig
Once you have gathered all the necessary gear, it’s time to assemble your iPhone filmmaking rig. Begin by attaching your iPhone securely to the smartphone mount, ensuring it is snug and stable. Adjust the mount to achieve the desired filming angle.
Attach your iPhone-compatible microphone to improve audio quality in your films. External microphones can minimize background noise and capture clear, crisp sound. Position the microphone close to your subject for optimal audio pickup.
Mount your iPhone onto the tripod or stabilizer to keep it steady during filming. Ensure the tripod legs are fully extended and stable on the ground. If using a stabilizer, balance it correctly to achieve smooth, fluid movements while filming.
Finally, test your rig by capturing some sample footage to ensure everything is set up correctly. Adjust the settings on your iPhone for optimal video quality and make any necessary tweaks to your rig before starting your film project.
Getting Awesome Shots With Your iPhone
In this section, we’ll discuss techniques for capturing amazing shots using your iPhone and the filmmaking gear we’ve mentioned earlier.

Image courtesy of digitalfilmmaker.net via Google Images
Using Angles and Composition
One way to make your shots stand out is by playing with different angles and composition. Instead of shooting straight on, try getting down low or up high for a unique perspective. You can also experiment with framing your subject off-center for a more dynamic shot.
Understanding Lighting
Lighting plays a crucial role in filmmaking. Even with the best gear, poor lighting can make your shots look dull and amateurish. When shooting with your iPhone, try to take advantage of natural light or invest in some basic lighting equipment to enhance your scenes. Pay attention to the direction and intensity of light to create mood and drama in your shots.
Editing Your Film on the iPhone
Once you have captured all your footage using your iPhone and all the filmmaking gear we discussed, it’s time to put it all together to create your movie. Editing is where you can bring your story to life and make it look polished and professional. Luckily, there are several editing apps available right on your iPhone to help you do just that.
Choosing an Editing App
There are many different apps out there that can help you edit your film on your iPhone. Some popular ones include iMovie, Adobe Premiere Rush, and Filmmaker Pro. These apps offer various features like cutting and trimming clips, adding transitions, music, and special effects, and adjusting the colors and audio of your film. Take some time to explore these apps and see which one works best for you and your project.
Basics of Film Editing
Editing may seem intimidating at first, but with a few basic techniques, you can start putting together your movie like a pro. Start by importing all your footage into the editing app. Then, arrange your clips in the order you want them to appear in your film. You can cut out any unwanted parts, trim clips, and add transitions between scenes for a smooth flow.
Experiment with adding music and sound effects to enhance the mood of your film. You can also adjust the colors and brightness of your clips to make them look more cinematic. Don’t forget to add titles and credits to give your film a professional touch.
As you edit, don’t be afraid to try new things and play around with different features in the app. The more you practice, the better you’ll become at editing your films on your iPhone.
Sharing Your iPhone Film With the World
So, you’ve put in the hard work, you’ve filmed your movie using your iPhone and all the cool gear we talked about. Now, it’s time to share your masterpiece with the world!
Where to Upload Your Film
There are many places on the internet where you can upload your film for others to see. Platforms like YouTube, Vimeo, and Instagram are great options. These websites allow you to share your film with a wide audience and get feedback from viewers.
Getting Feedback and Learning
Once you’ve uploaded your film, don’t forget to pay attention to the comments and feedback you receive. Feedback from others can help you learn and grow as a filmmaker. It’s important to listen to what people have to say about your film, whether it’s positive or negative, and use it to improve your skills.
Generated by Texta.ai Blog Automation